Tracking Remote Teams
Insightful has specific settings which are perfect for tracking remote teams. Learn how to set up our software and how to use it in such environment.

Speak with a Productivity Expert
Give us 30 minutes and we’ll show you how we can help you achieve better results.
 |  |  |  |  |  |  | ||||||
|---|---|---|---|---|---|---|---|---|---|---|---|---|
| OVERVIEW | ||||||||||||
| Price | $6/user/month | $6/user/month | $7.20/user/month | $7/user/month | $7/user/month | $9.99/user/month | $6/user/month | $9.99/user/month | $150/licence/year | $60/licence (lifetime) | ||
| Free trial | 7 days | 7 days | No | 14 days | 14 days | 14 days | 30 days | 7 days | Yes | 30 days | ||
| Ease of use | Very easy | Difficult | Very easy | Easy | Easy | Very easy | Very easy | Very easy | Very difficult | Easy | ||
| TRACKING METHODS | ||||||||||||
| Unlimited (tracker working 24/7) | ||||||||||||
| Fixed (defined working hours) | ||||||||||||
| Automatic (when computer is connected to a specified network) | ||||||||||||
| Manual (start/stop) | ||||||||||||
| Project based (track time only on projects) | ||||||||||||
| GENERAL MONITORING FEATURES | ||||||||||||
| Stealth mode | ||||||||||||
| App and website usage | ||||||||||||
| Real-time monitoring | ||||||||||||
| Offline time tracking | ||||||||||||
| Attendance | ||||||||||||
| Activity levels | ||||||||||||
| Keylogger | ||||||||||||
| Geolocation | ||||||||||||
| Remote desktop control | ||||||||||||
| Website/activity blocking | ||||||||||||
| SCREENSHOTS AND RECORDING | ||||||||||||
| Screenshots | ||||||||||||
| Screenshots on demand | ||||||||||||
| Screen recording | ||||||||||||
| PRODUCTIVITY FEATURES | ||||||||||||
| Productivity trends | ||||||||||||
| Websites and apps labeling | ||||||||||||
| Category labeling | ||||||||||||
| Productivity alerts | ||||||||||||
| ADVANCED SECURITY FEATURES | ||||||||||||
| User behavior analytics | ||||||||||||
| Data loss prevention | ||||||||||||
| Advanced file and web monitoring | ||||||||||||
| REPORTING | ||||||||||||
| Productivity reports | ||||||||||||
| Team reports | ||||||||||||
| Timelines | ||||||||||||
| Email reports | ||||||||||||
| Access management | ||||||||||||
| PLATFORMS | ||||||||||||
| Web | ||||||||||||
| Mac desktop app | ||||||||||||
| Windows desktop app | ||||||||||||
| Linux desktop app | ||||||||||||
| Mobile app | iOS, Android | iOS, Android | iOS, Android | iOS, Android | iOS, Android | Android | ||||||
| Browser extension | Chrome | Chrome | Chrome | |||||||||
| Other | Citrix, VMware | Chrome OS | ||||||||||
| OTHER | ||||||||||||
| Support | Phone, email, online | Phone, email, online | Phone, email, online | Email, online | Phone, email, online, in-person | Online | Phone, email, online | Email, online, Viber, Whatsapp | Phone, email, online, support ticket | Phone, email, online | ||
| Knowledge base | ||||||||||||
| Video tutorials | ||||||||||||
| Integrations | comming soon | |||||||||||
| API | ||||||||||||
| Deployment | cloud, on-premise | cloud, on-premise, AWS, Azure | cloud | cloud | cloud | cloud | cloud | on-premise | cloud, on-premise | on-premise | ||
 |  |  |  |  |  |  |  |  |  | | ||
|---|---|---|---|---|---|---|---|---|---|---|---|---|
| OVERVIEW | ||||||||||||
| Price(per month) | Available upon request | From $2 per user | Available upon request | From $6.40 per user+$16 | Free for up to 75 users | From $2.50 per user | Basic plan:$30 for 5 users+$5 per additional user | From $1.50 per employee | From $4 per user+$8 | From $2.20 per user | $5.99 per user per month | |
| Free trial | 30 days | 14 days | Yes | 14 days | 14 days | 14 days | 30 days | 30 days,no credit card required | ||||
| Ease of use | Difficult | Easy | Difficult | Very easy | Easy | Easy | Difficult | Very easy | Easy | Easy | Easy | |
| FEATURES | ||||||||||||
| Timecard management | ||||||||||||
| Scheduling | ||||||||||||
| Shift Trading | ||||||||||||
| Timesheets | ||||||||||||
| Break time management | ||||||||||||
| Real-time tracking | ||||||||||||
| PTO Management | ||||||||||||
| Payroll | ||||||||||||
| Invoicing | ||||||||||||
| Client billing | ||||||||||||
| GPS tracking | ||||||||||||
| Clock out reminders | ||||||||||||
| Alerts | ||||||||||||
| Manual time | ||||||||||||
| PUNCH-IN METHODS | ||||||||||||
| Web app | ||||||||||||
| Mobile app | ||||||||||||
| Time clock device | ||||||||||||
| Time clock kiosk | ||||||||||||
| Facial recognition | ||||||||||||
| Fingerprint scanning | ||||||||||||
| Geofencing | ||||||||||||
| Group punch-in | ||||||||||||
| REPORTING | ||||||||||||
| Visual reports | ||||||||||||
| Email reports | ||||||||||||
| Time rounding | ||||||||||||
| MANAGEMENT | ||||||||||||
| Permissions | ||||||||||||
| Manager approvals | ||||||||||||
| Add time for others | ||||||||||||
| Integrations | ||||||||||||
| PLATFORMS | ||||||||||||
| Web | ||||||||||||
| Android app | ||||||||||||
| iOS app | ||||||||||||
| Mac desktop app | ||||||||||||
| Windows desktop app | ||||||||||||
| Linux desktop app | ||||||||||||
| OTHER | ||||||||||||
| Support | Phone and online | Phone and online | Phone,chat and online | Phone and chat | Email and online | Chat and phone | Phone,email,chat and online | Phone and online | Phone,email,chat and online | Phone and online | Online chat and video support in English,French,and Spanish | |
| Knowledge base | ||||||||||||
| Video tutorials | ||||||||||||
| Community forum | ||||||||||||
| API | ||||||||||||
 |  | |  |  |  |  |  |  | ||||
|---|---|---|---|---|---|---|---|---|---|---|---|---|
| OVERVIEW | ||||||||||||
| Price (per month) | $6 per user | $5.83 per user | $9 per user | $9.99 per user | $10.80 per user | $5.25 per user | $99 for 5 users | $7 per user | $19 for 10 projects | $5 per user | ||
| Free trial | 7 days | 14 days | 30 days | 14 days | 30 days | Yes | 14 days | 14 days | 30 days | 30 days | ||
| Ease of use | Very easy | Difficult | Difficult | Very easy | Easy | Very easy | Easy | Difficult | Very easy | Difficult | ||
| TIME TRACKING METHODS | ||||||||||||
| Manual | ||||||||||||
| Start/stop buttons | ||||||||||||
| Automatic time mapping | ||||||||||||
| IN-DEPTH TASK AND PROJECT ANALYSIS | ||||||||||||
| Screenshots | ||||||||||||
| App and website usage | ||||||||||||
| Activity levels | coming soon | |||||||||||
| Real-time tracking | ||||||||||||
| TASK AND PROJECT MANAGEMENT | ||||||||||||
| Project adding | ||||||||||||
| Project templates | ||||||||||||
| Project status | ||||||||||||
| Task assignment | ||||||||||||
| Task priorities | ||||||||||||
| Budgeting | coming soon | |||||||||||
| Mark billable/non-billable hours | ||||||||||||
| Payroll calculation | ||||||||||||
| Invoicing | ||||||||||||
| ALERTS | ||||||||||||
| Idle time reminders | ||||||||||||
| Deadline alerts | coming soon | |||||||||||
| Budget alerts | coming soon | |||||||||||
| REPORTING | ||||||||||||
| Client login | ||||||||||||
| Productivity analysis | ||||||||||||
| Email reports | coming soon | |||||||||||
| PLATFORMS | ||||||||||||
| Web | ||||||||||||
| Mac desktop app | ||||||||||||
| Windows desktop app | ||||||||||||
| Linux desktop app | coming soon | |||||||||||
| iOS app | Beta | |||||||||||
| Android app | ||||||||||||
| Browser extension | Chrome | Chrome, Firefox | Chrome | Chrome | Chrome, Firefox | Chrome | Chrome, Firefox, Opera, Edge | |||||
| OTHER | ||||||||||||
| Support | Phone and online | Email and online | Email and online | Online | Online, email and phone | Email, online and support ticket | Email and chat | Email and chat | Chat | |||
| Knowledge base | ||||||||||||
| Video tutorials | ||||||||||||
| Integrations | coming soon | |||||||||||
| API | ||||||||||||
| On-premise hosting | ||||||||||||
Insightful is a time tracking and employee monitoring software suitable for both remote offices as well as remote individuals. On this page you can read all about how to set the app properly for teleworkers, telecommuters and other types of freelancers and remote teams, so bookmark it as a manual!
We recommend that you set this up as soon as you start the onboarding process, but you can do it later as well, or change the settings anytime. The sooner you implement the computer activity tracker, the more time you and your remote team will have to adjust to it and get a hang of using all its features.
Sign-Up and Installation
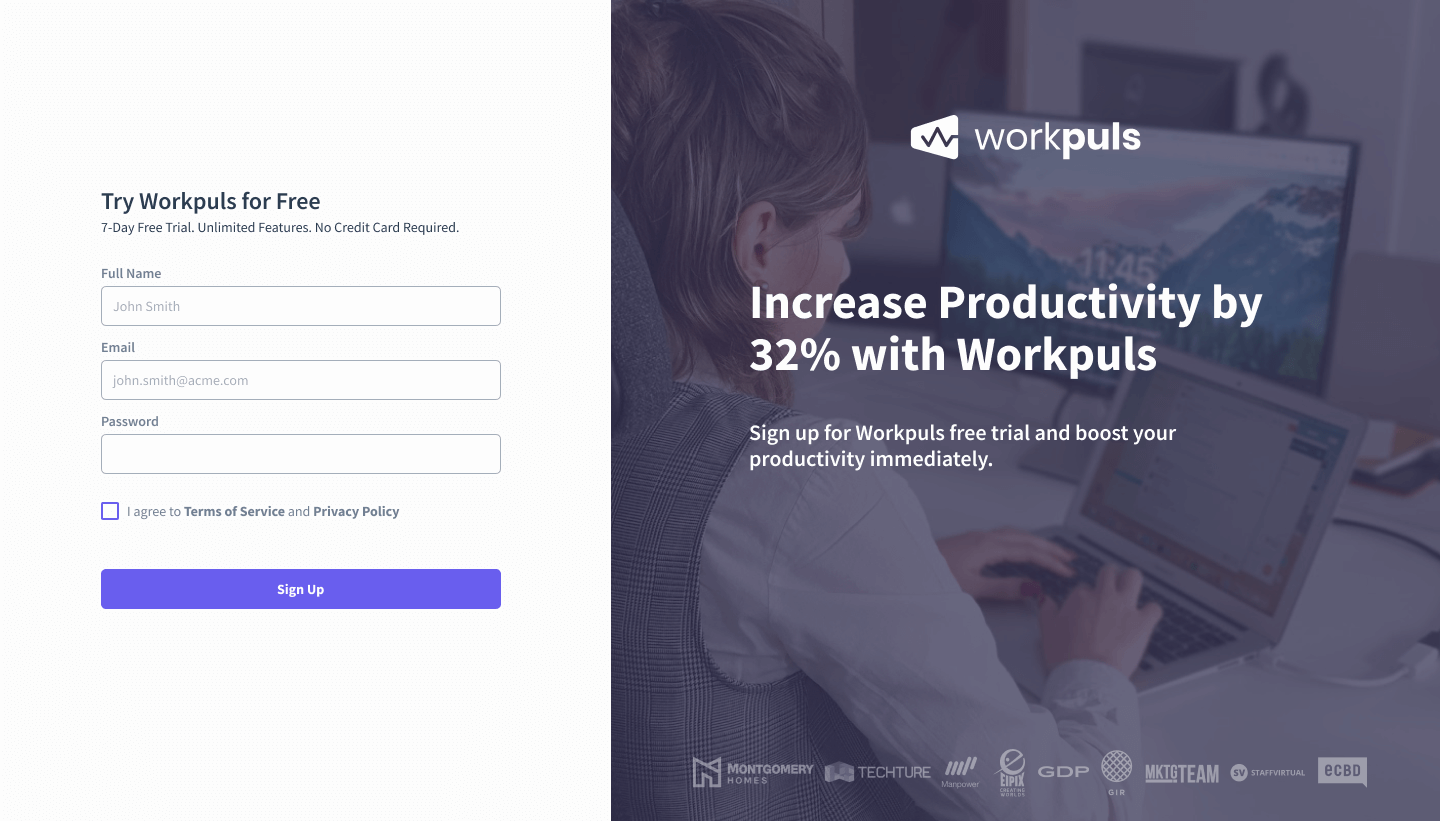
The first step to getting your Insightful computer activity tracker is to sign up in order to get access to the dashboard - a web interface that allows you to see the data on your employees’ performance. To do this, navigate to the sign-up page, enter your name, email and create your password.
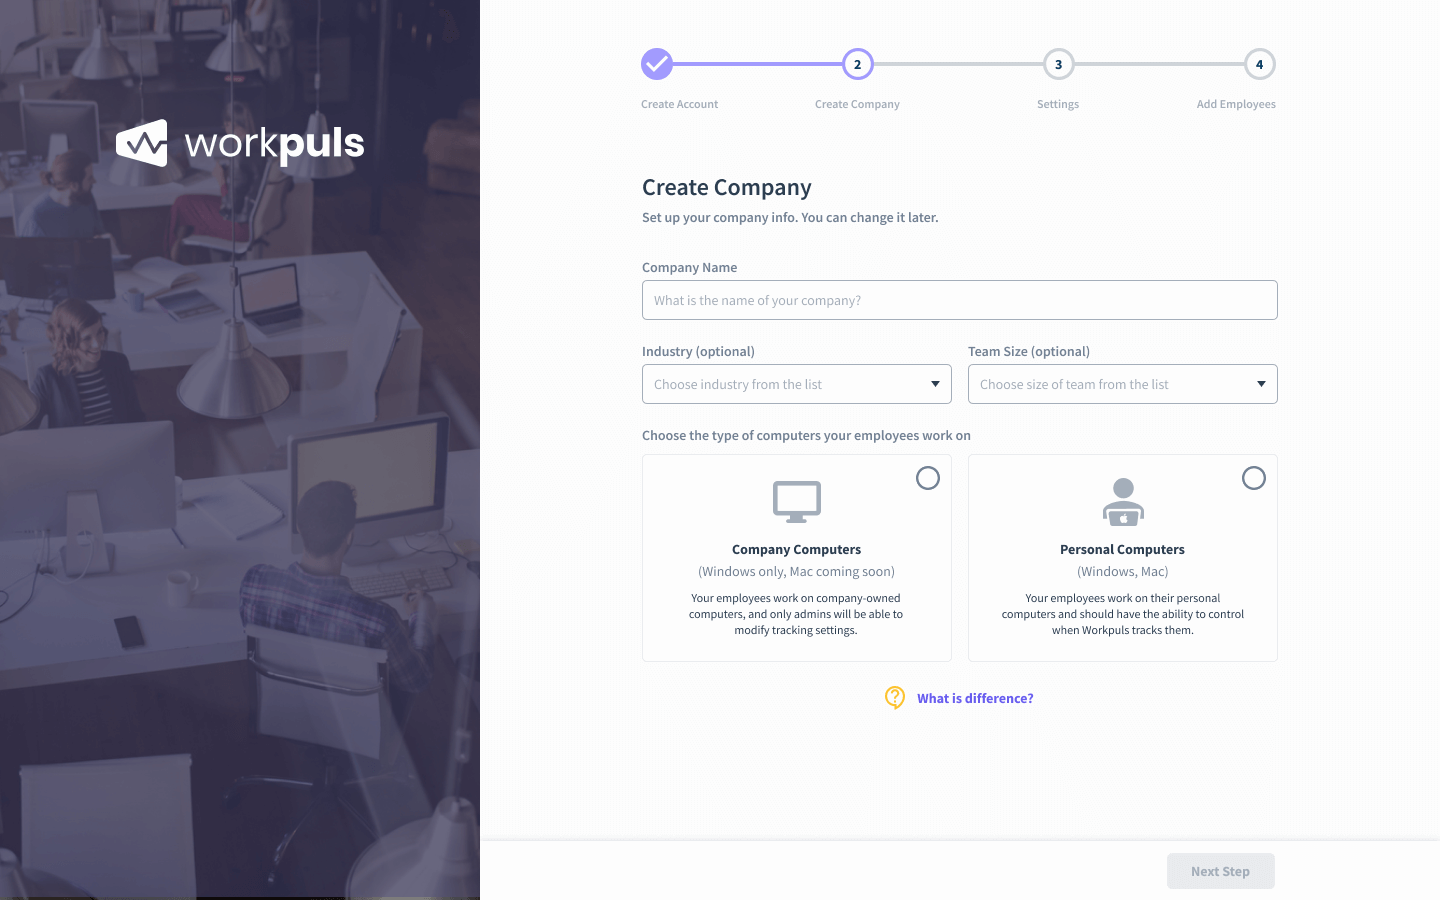
The next step is to create your company. Enter all the necessary information about your team, and choose Personal Computers at the bottom. What this option does is give your remote workers some choice over what will be tracked and when, since they likely use their own computers to work at home, so this is a way to protect their personal privacy.
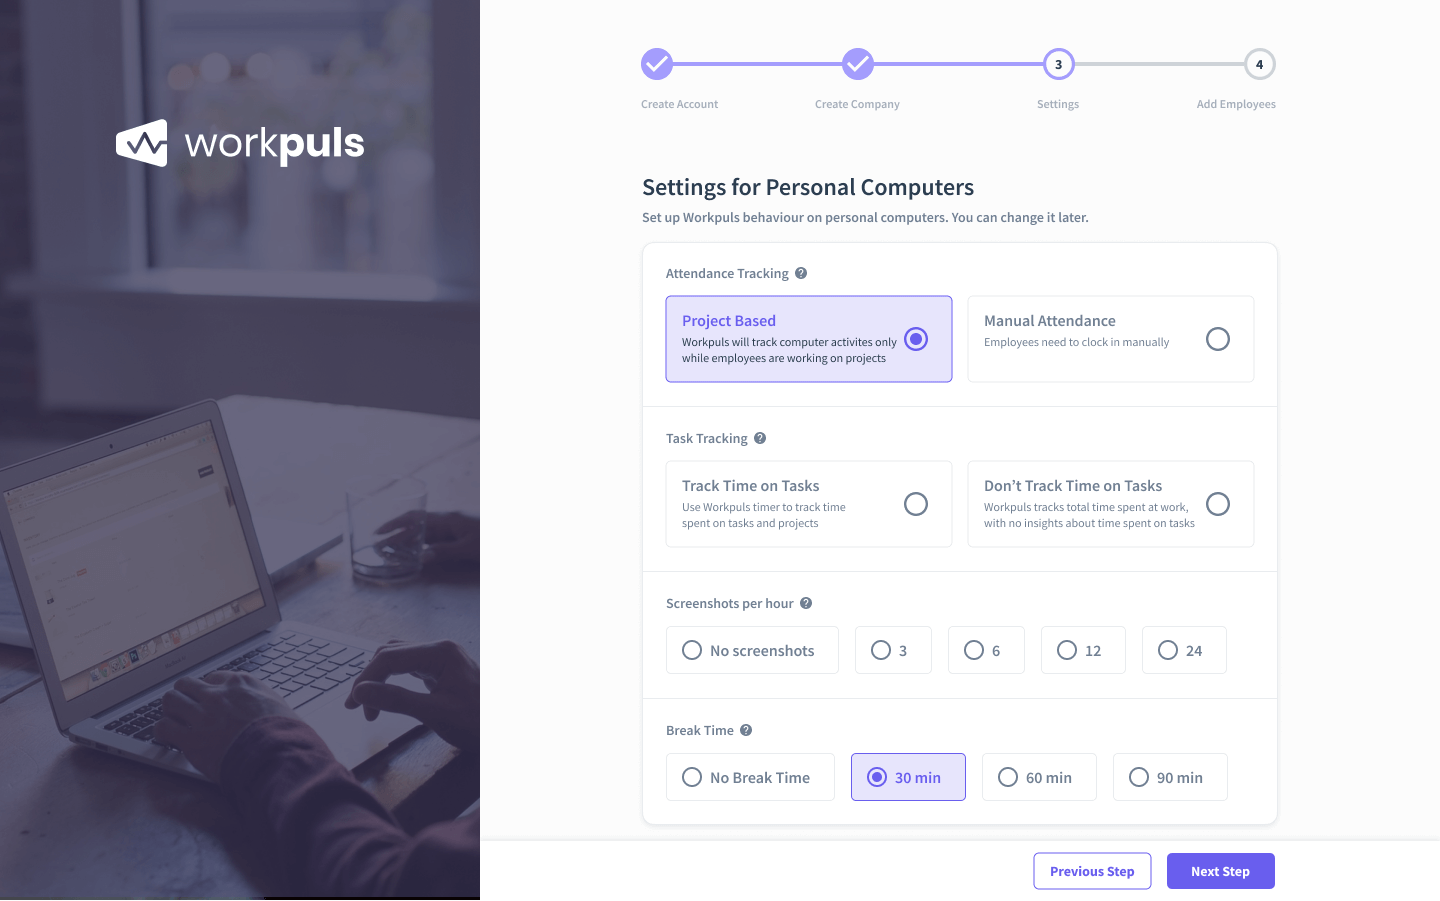
From now on, all you have to do to complete the setup is follow the instructions and choose the settings that reflect how you want to track your team. Each option is explained as you go, so make sure to get familiar with every feature. In this stage of the setup, you’ll be asked to choose whether you’ll be tracking employees only when they’re working on projects (Project Based) or all the time starting with when they manually clock in and stopping when they clock out (Manual Attendance).
Based on which one you choose, you’ll have some additional settings to tweak, such as whether you want to track their time on tasks (which is definitely recommended), how many screenshots you want to automatically take per hour (if any), and how long their break time is (if you don’t have a specified break duration in your policy, you should choose the option No Break Time).
Finally, you’ll need to send the installation invite to your remote team. This is done via the Add Employees window, where you can make a list of the employees you want to add and track. All you need to do is add each employee’s name, email and select the team they belong to (you can make your custom teams by clicking on Create new team).
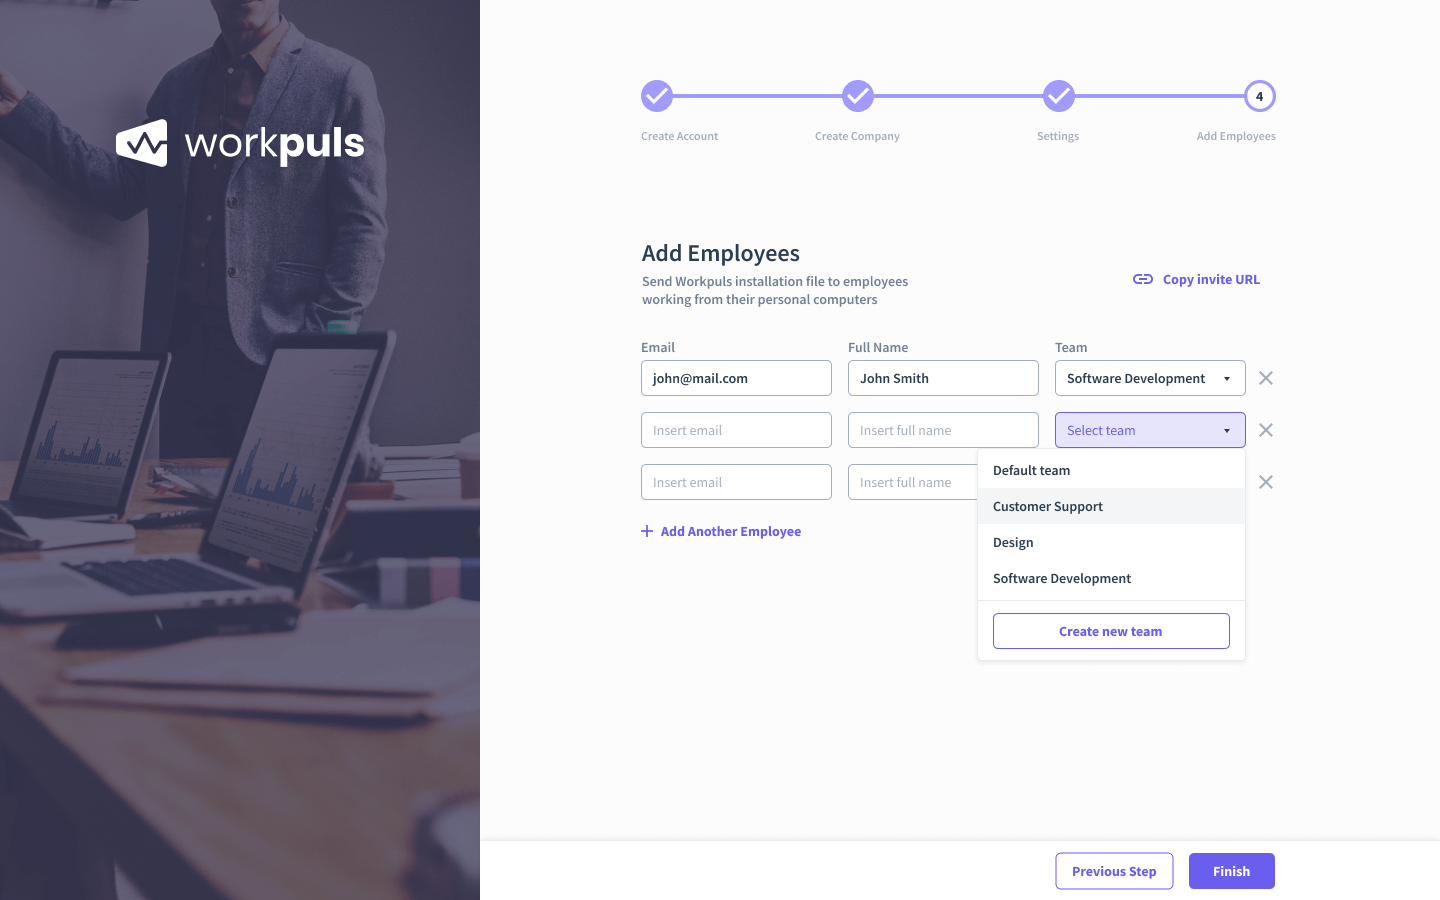
When you click Finish, all the employees that you’ve added will receive an email where they can find instructions on where and how to sign up for computer activity tracker and install the Insightful agent. It’s a standard installation process for either Windows or macOS, depending on what operating system their computers run on.
Time and Attendance in Different Time Zones
Insightful captures time from employees’ computers, meaning that if your people are working in different time zones, our software shows their clock in/clock out time as it is where they work from (in their time zone). You can easily and accurately access the information regarding the off-days, or see what was happening on a particular date.
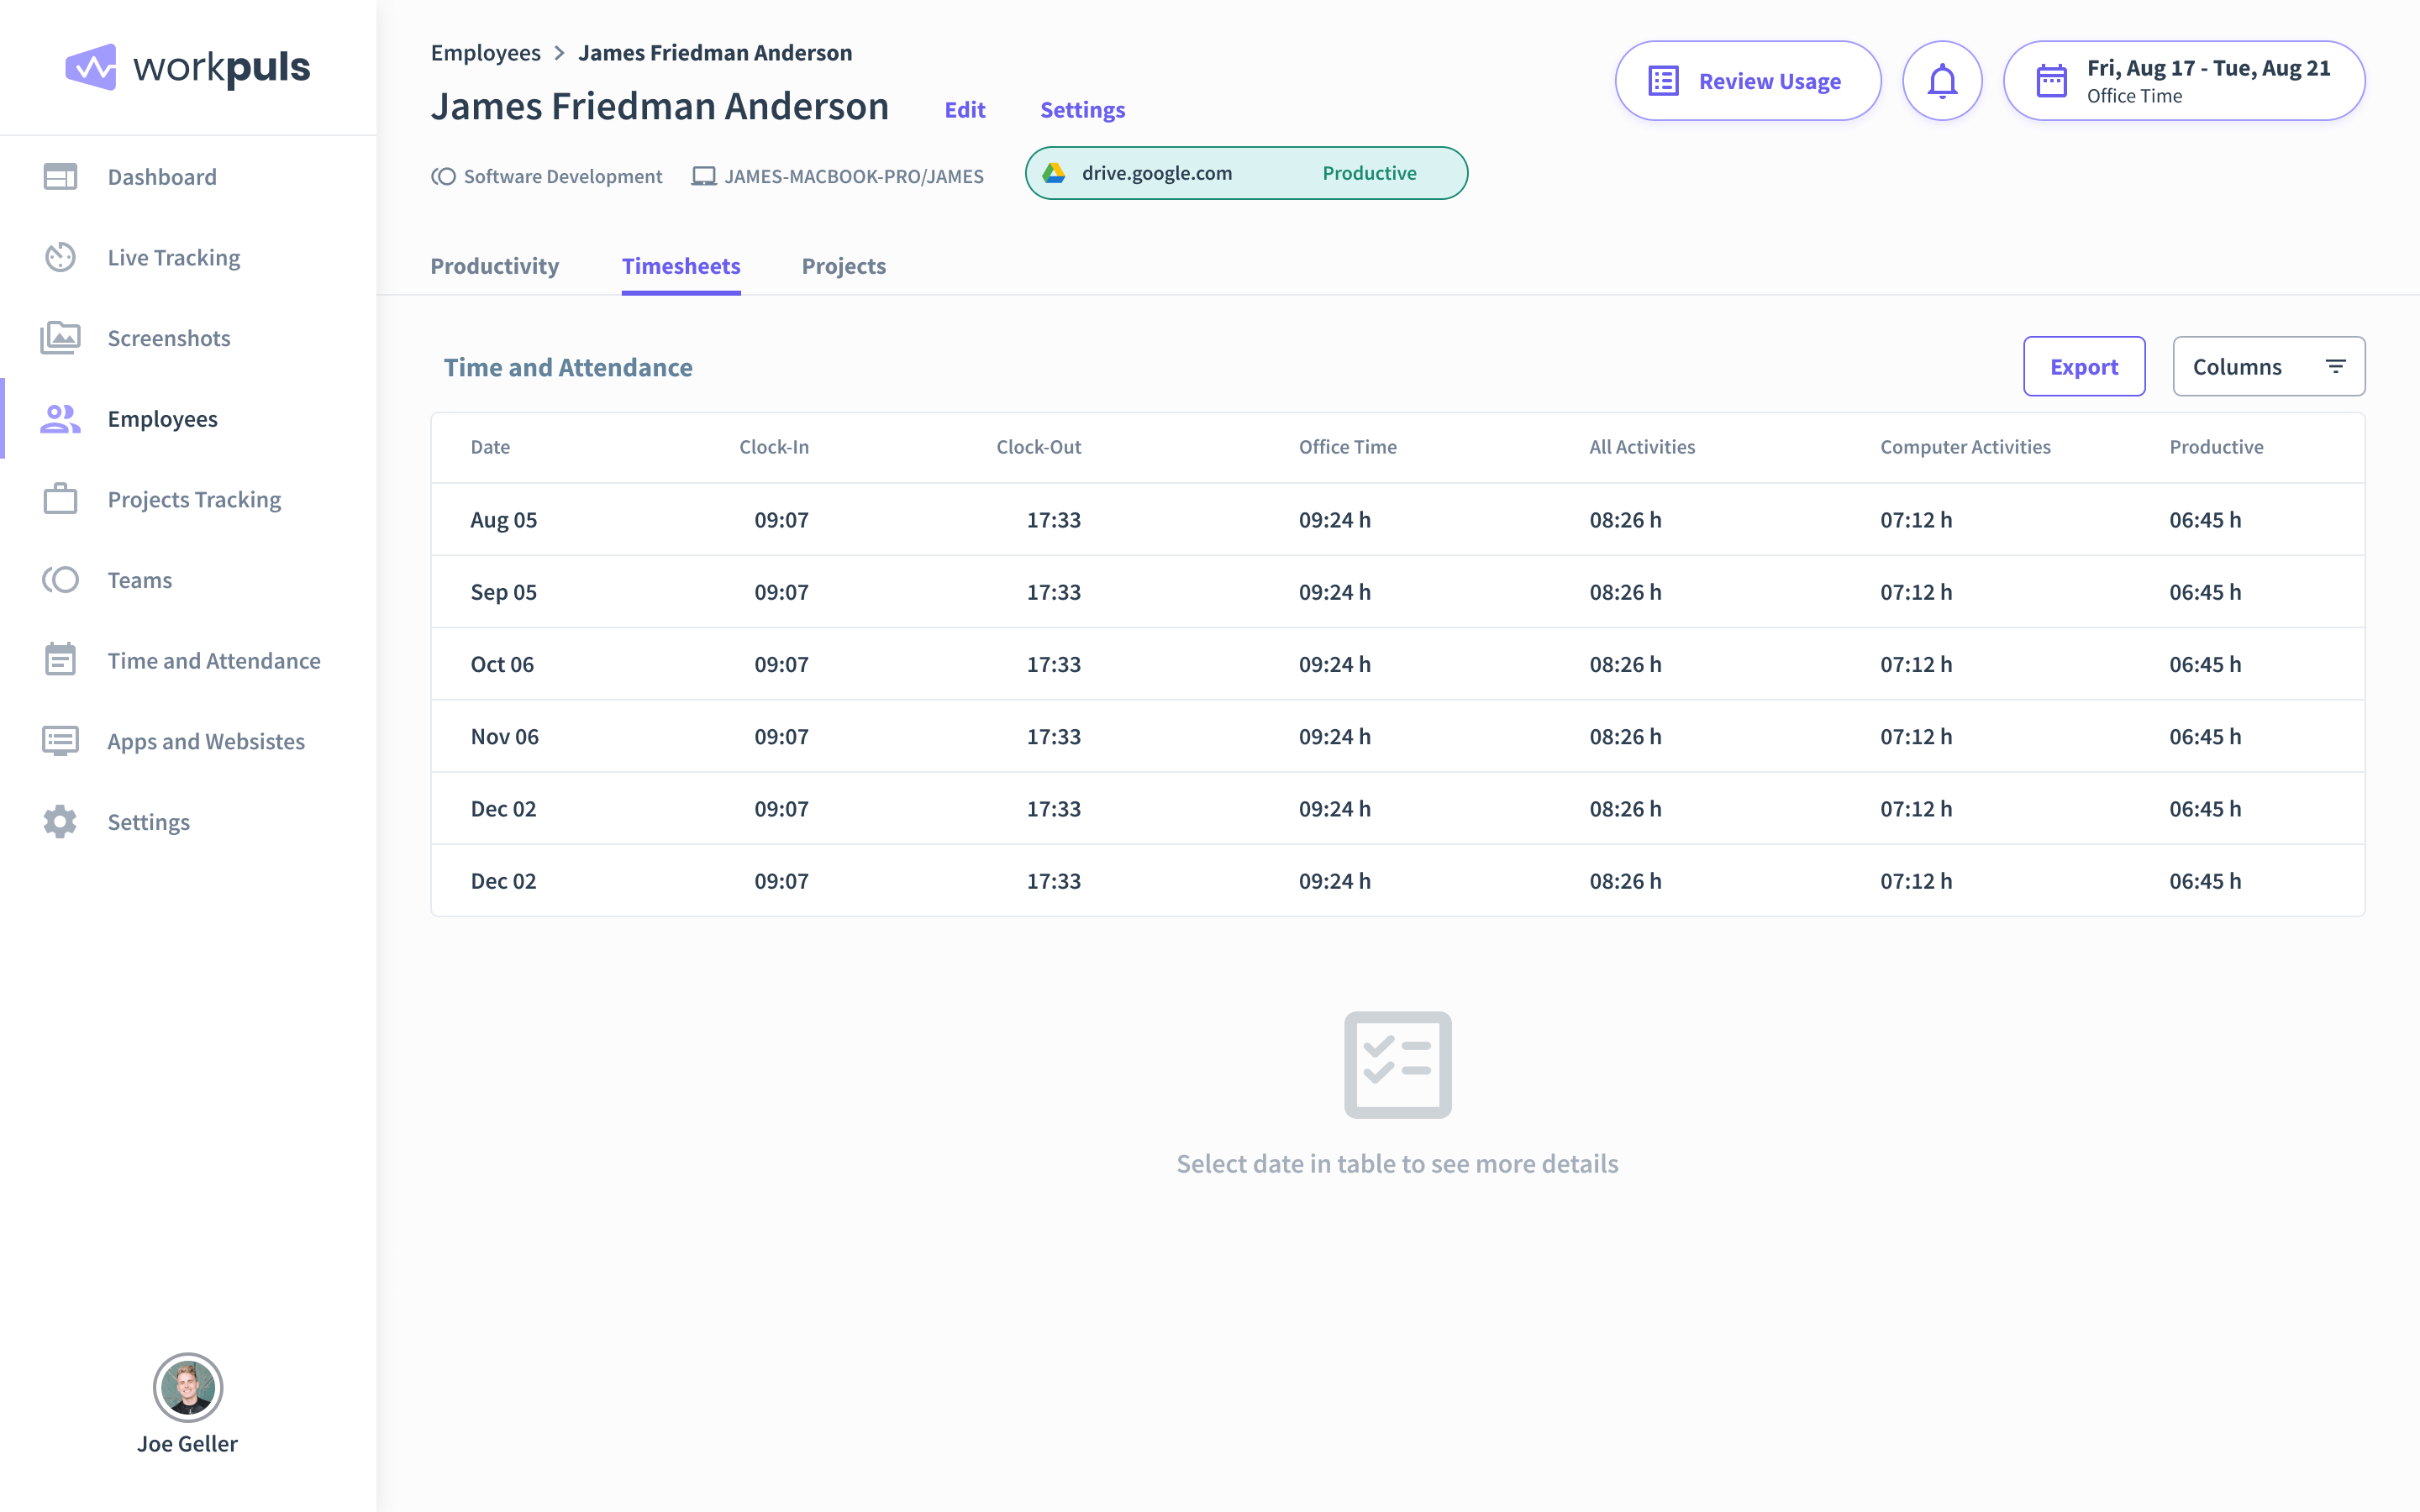
Proof of Work
You can use Insightful to make sure you are paying for the correct number of hours, or that remote workers are on the task. You can also enable your employees the access to their own profiles to see how much money they earned, or how much time they have been working on your project. It’s the simplest remote employee time tracking software.
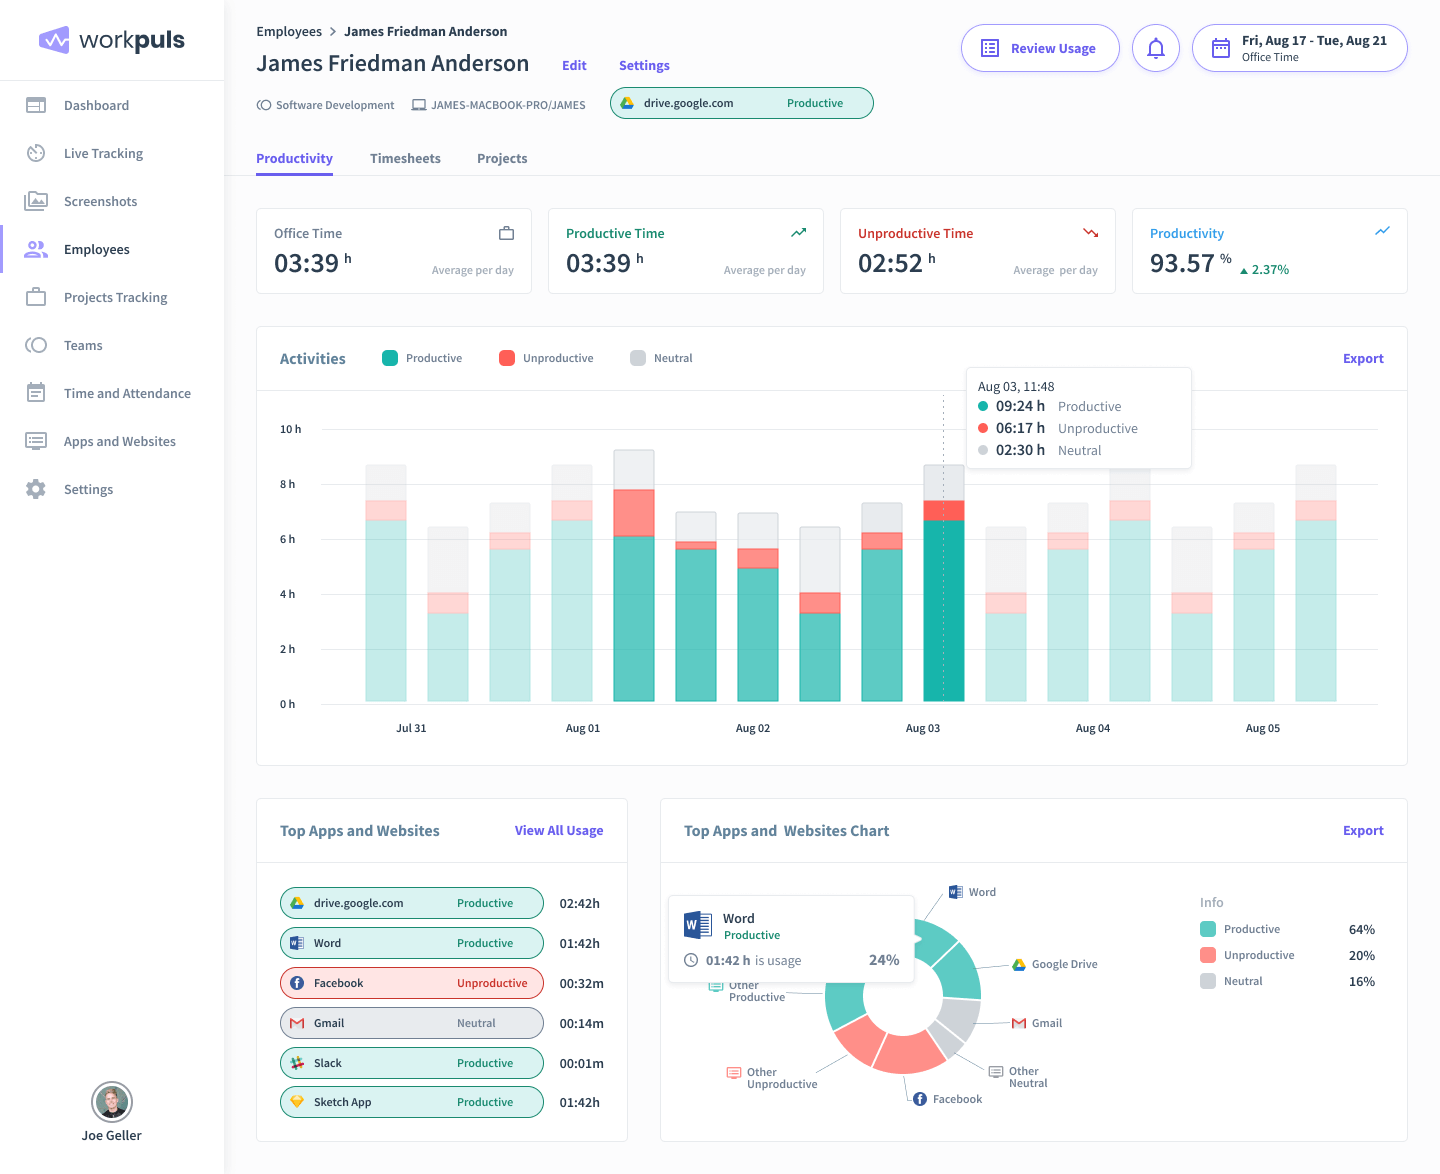
In addition, the Productivity panel has lots of useful stats on each employee, which will give you an insight into how your remote workforce uses their working hours. This includes the ratio of productive to unproductive time, productivity trends, most frequently used apps and websites, as well as a graph of employee’s biorhythm that shows you when they’re most productive during the day.
Start/Stop Insightful
Remote workers can turn Insightful on when they start, or turn it off when they finish or pause working. This way you can be certain that you are paying for the correct number of hours, and employees can have a solid proof of their work.
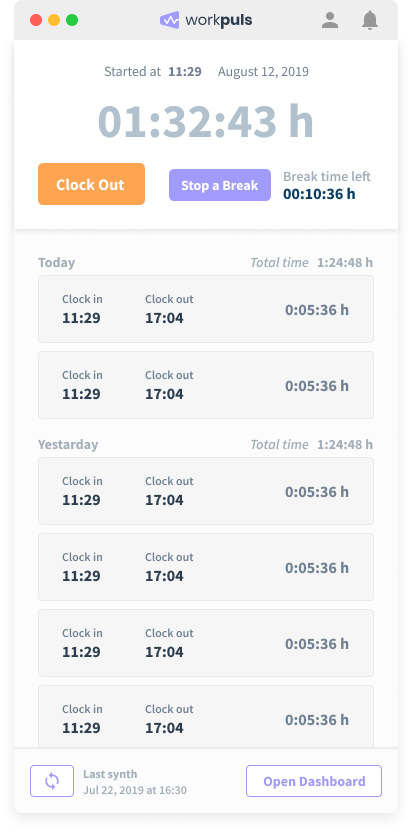
If you’ve chosen Manual Attendance when setting up your employee activity tracker, your employees will be able to see the following window where they can click Clock In when they’re ready to start working:
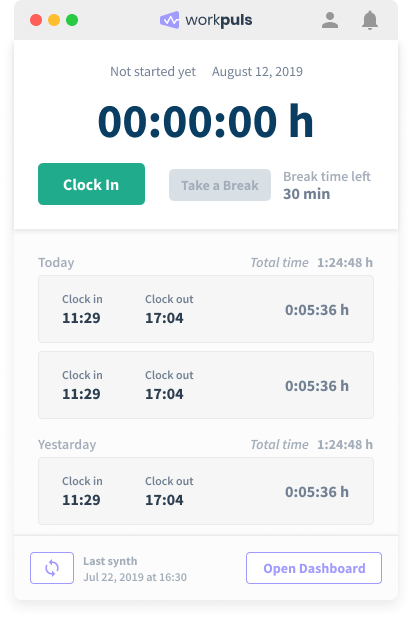
Once they’re clocked in, they can track the total time they spend at work. They can also click on Take a Break when they’re on a break and track how much break time they have left on the right of the button. When they’re done for the day, they should click on Clock Out and their time and activities will no longer be recorded.
If you want to change the way attendance is tracked, you can do so in the settings. Navigate to the Settings on the left side of your dashboard, and then select Shared Settings. When you select your company team from the list, the following settings panel should open:
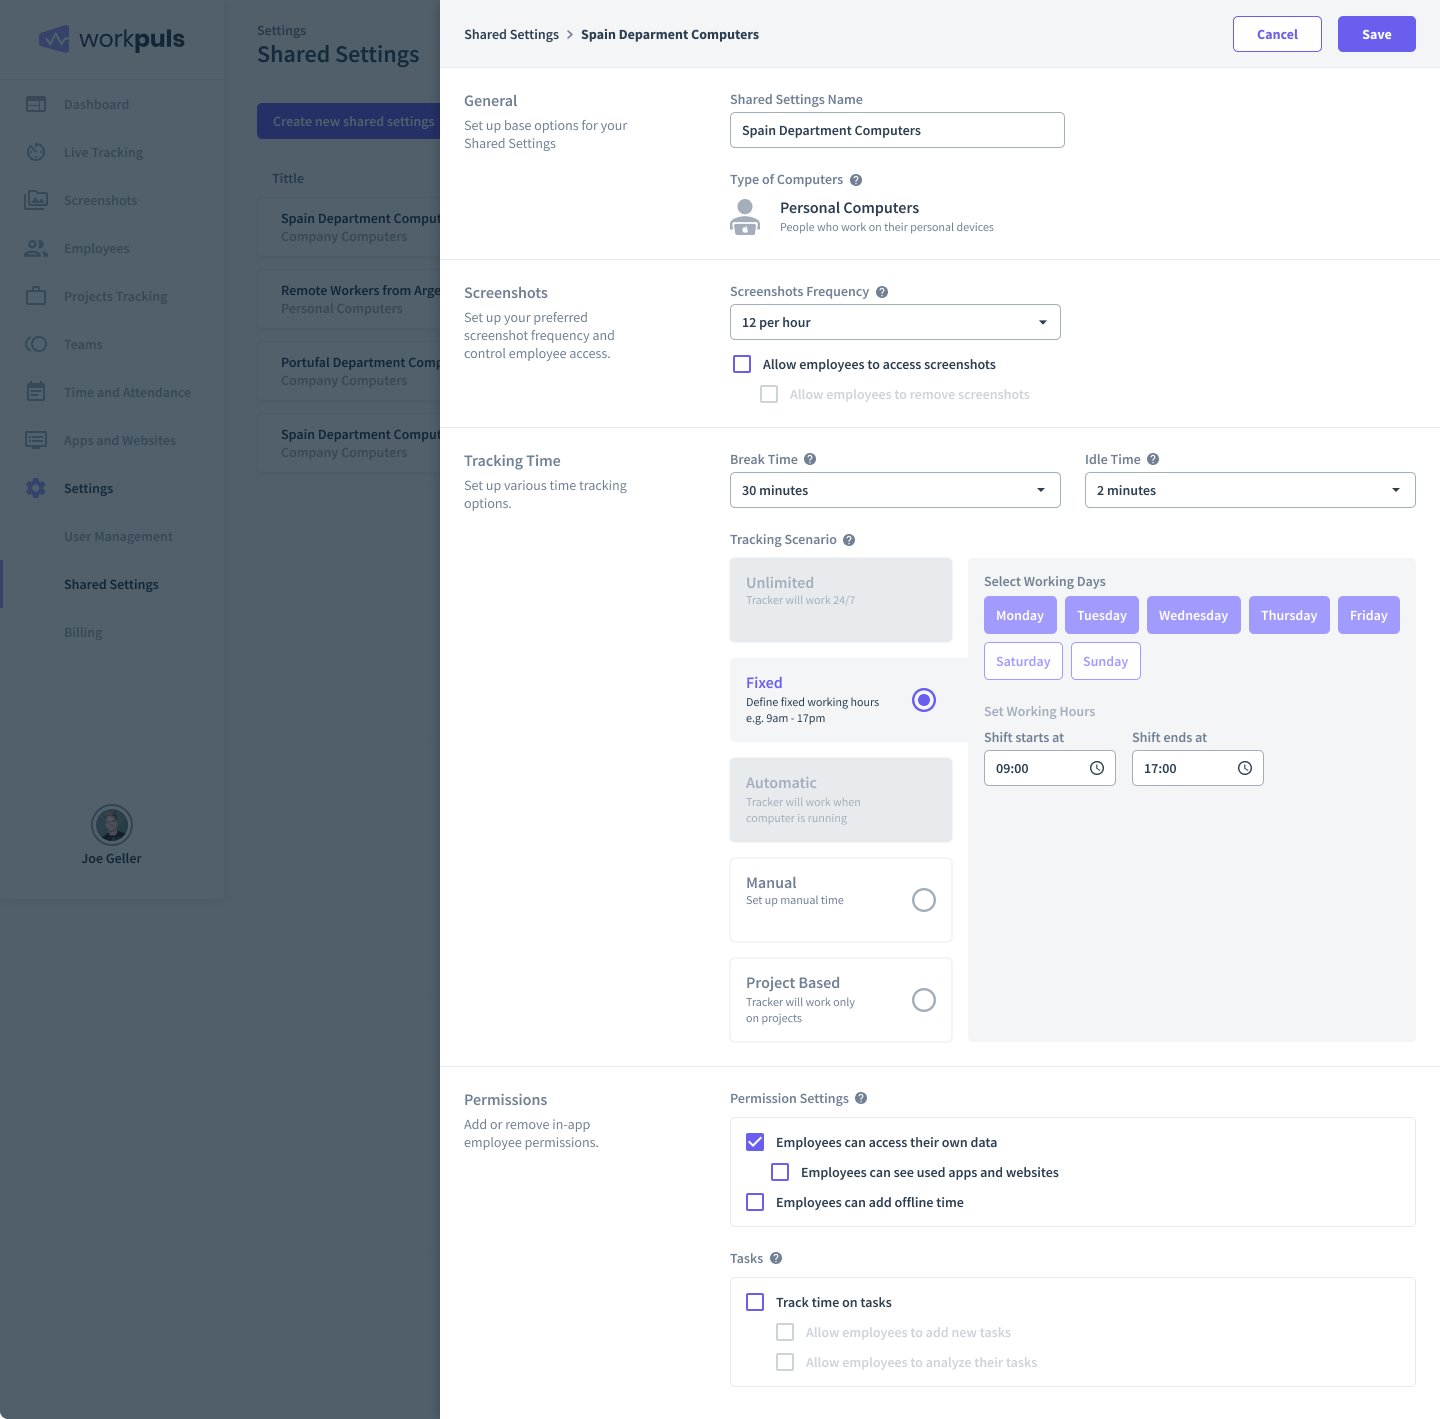
In the Tracking Time section, you can choose your tracking scenario - whether you want employees to continue manually clocking in or whether you want to switch to project-based tracking or even set fixed working hours.
Projects and Tasks
One of the most useful features of a computer activity tracker for remote teams is the overview of projects and tasks that each employee is working on. This makes it easier to see what your telecommuters are working on at any given time, but it’s also handy for workers themselves because they have a list of tasks grouped into projects that they need to do.
Tracking time on these tasks is important not only as a proof of work, but also as a way to better evaluate your team’s efficiency and make better project estimates in the future. Your employees can indicate which task they’re working on by going to the Time Tracking section of their Insightful agent, where they can choose a project and task and start tracking their time on it.

Timeline
Timeline shows the list of events and activities that occurred during one day.
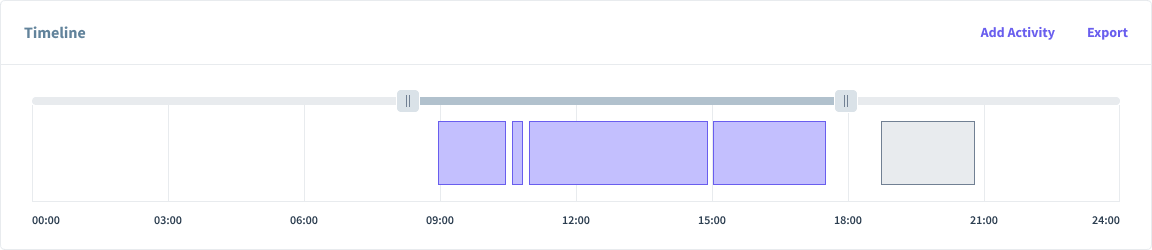
Purple color represents Computer Activities (a person was actively working on computer in either Productive, Unproductive or Neutral Apps and Websites; this is filled automatically from the data Insightful collected and cannot be deleted). White gaps represent Idle time (there was no computer usage recorded during this period). Grey parts are Other activities, which were added manually (phone calls, meetings, brainstorming sessions etc.). Please note that the manual adding option will be available within the coming weeks.
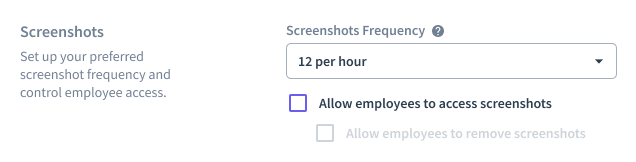
Screenshots
This feature is optional and in order to get it, you have to first enable it when you initially set up your company on sign-up or later on in Shared Settings. That’s where you can also set the number of random screenshots that will be taken in one hour.
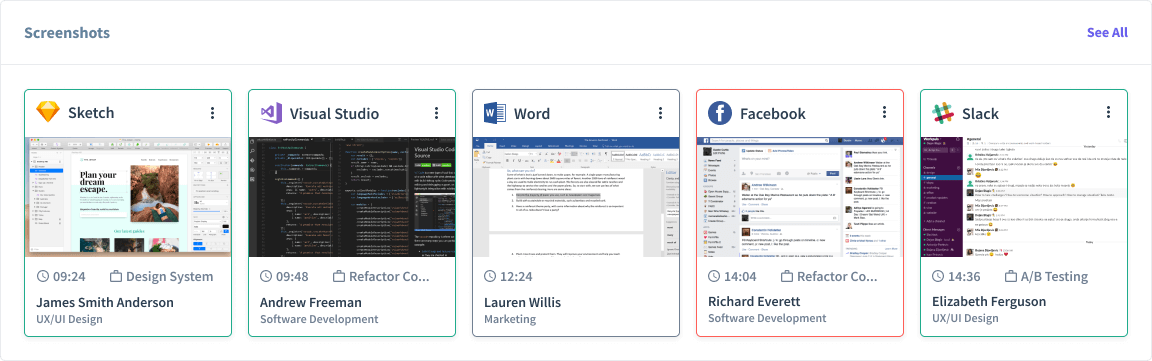
You can access screenshots on every person’s individual page, along with all the other data (Time and Attendance, Productivity etc.). It looks like this:
Conclusion
Congratulations! You’ve successfully implemented Insightful monitoring software for your remote teams. Now you can use it to get insights into their performance, attendance, productivity, projects and tasks, and other stuff that you can use to optimize their workflow and track their progress. Just make sure that you set up all the features in a way that they can reflect your business goals and you’ll be on your way to taking your remote workers’ performance to the next level!
This article was originally written on May 15th, 2015 by Marija Grgur. It was updated by Kristina Valjarevic on February 13th, 2020.
Related Posts
.png)
Amplifying Productivity: How to Track Remote Work Effectively
Discover effective advice on how to track remote work and enhance employee productivity. Learn how Insightful can help you automate the tracking process and improve both performance assessment and employee well-being.


%20(2)%20(1).png)
How to Measure Productivity of an Employee Working from Home: 3 Pillars of Remote Team Success
Would you like to stay ahead of other employers by allowing remote work while also ensuring great business results? Read this short guide to find out how to measure the productivity of an employee working from home for maximum efficacy.
.png)
How to Manage Remote Workers' Productivity: Ensuring Efficiency & Engagement from Afar
Learn how to manage remote workers' productivity and enhance their job satisfaction. Read more about supporting open communication, setting defined expectations, and fostering team spirit.

